|
Web Hosting Services Support
E-Mail Configuration
Microsoft Outlook 97/2000/Express
Netscape Navigator
Eudora
Pegasus Mail
Microsoft Outlook 97/2000/Express
Depending on which version of Outlook you have, the menus
and fields explained in this section may be slightly different than what you see on your
screen.
- Open Outlook
- Go to the 'Tools' menu, and then click on 'Services' ('Accounts' for Express)
- You should now see a window with all your Outlook accounts (Address Book, Personal
Folders, etc...).
- Click on the 'Add...' button ('New -> Mail' for Express)
- Click on 'Internet Email' and click 'OK'
- Insert the information listed below:
Mail Account: A name to refer to this email account as (i.e. SelectNet
Email)
Name: Your name
Organization: Optional
Email Address: The email address you would like people to see on messages
you send
- Now click on the 'Servers' tab located near the top of the window and insert the
following information:
Outgoing Mail (SMTP): pop3.slctnet.com
Incoming Mail (POP3): pop3.slctnet.com
Account Name: Your Username, all lowercase
Password: The password associated with your username, case-sensitive
NOTE: If you are not using SelectNet as your Internet access provider you must select the option "My Server requires authentication" (see below).
- On the 'Connection' tab, make sure 'I use a LAN connection' is bubbled
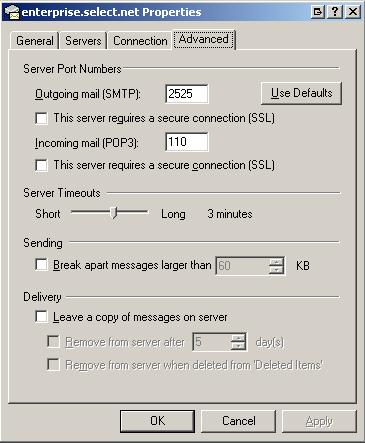
- On the 'Advanced' tab, make sure no 'Secure Authentication' boxes are checked, and
'Leave Messages on Server' is not checked.
- Also on the 'Advanced' tab, under the section 'Server Port Numbers' change the 'Outgoing
mail (SMTP)' from the default of '25' to '2525'.
- Also on the 'Advanced' tab, under the section 'Server Timeouts' drag the slider bar to the
right until the timeout label to the right reads at least '3 minutes' (see below)
- Hit 'OK', then 'OK' again to close the window
- Close and re-open Outlook
- Go to 'Tools', then click 'Send and Receive Messages' to check your mail. Any new
messages will be saved in your inbox
Example Screen Shots:
Netscape Navigator
Depending on which version of Netscape Navigator
or Netscape Communicator you are using, the menus and fields explained in this section may
be slightly different than what you see on your screen.
- Open Netscape
- Go to the 'Edit' menu, and then click on 'Prefrences'
- Expand the 'Mail & Newsgroups' tree by clicking on the + sign
- Next to the 'Incoming Mail Servers' window, click 'Add...' (if there is already a server
there, click 'Edit...')
- Insert the following information:
Sever Name: pop3.slctnet.com
Server Type: POP3
User Name: Your Username, all lowercase
- You can also check 'Remember password', and 'Check for new messages every X
mintues'
- Under the 'POP' tab near the top, make sure 'Leave messages on server' is not checked
- Click 'OK'
- Now in the mail window:
Outgoing (SMTP) Mail: pop3.slctnet.com
Outgoing mail server user name: Your Username, all lowercase
Use Secure Socket: Never
- Click 'OK'
- Now go to the 'Communicator' menu, then 'Messanger'
- Click 'Get Msg' to retrieve new mail
Example Screen Shots:
Eudora
Depending on which version of Eudora you are
using, the menus and fields explained in this section may be slightly different than what
you see on your screen.
- Open Eudora
- Go to the 'Tools' menu and click on 'Options...'
- On the 'Getting Started' form insert:
Real Name: Your name
Mail Server (Incoming): pop3.slctnet.com
Login Name: Your Username, all lowercase
SMTP Server (Outgoing): pop3.slctnet.com
- Go through the rest of the forms to set up your personal
settings.
- When you are done, hit 'OK'
- Now go to the 'File' menu, and hit 'Check Mail'. New mail
will be stored in the In Box
Example Screen Shots:
Pegasus Mail
Depending on which version of Pegasus Mail you are
using, the menus and fields explained in this section may be slightly different than what
you see on your screen.
- Open Pegasus Mail
- Go to the 'Tools' menu, then 'Internet Options...'
- Enter your email address in the 'My email address
is:' field
- Click on the 'Receiving (POP3)' tab near the top of
the window and enter:
POP3 Host: pop3.slctnet.com
User Name: Your username, all lowercase
Password: Your password, case-sensitive
- Click on the 'Sending (SMPT)' tab near the top and
enter:
SMTP Host: pop3.slctnet.com
- You can go through and set up any personal options
at this time
- Hit 'OK' to close the window
- To check your mail, go to the 'File' menu and hit
'Check host for new mail'
|